Showing posts with label Creating. Show all posts

Monday, January 7, 2013

Book Love & Kid-made Ornaments


HAND IN HAND : Crafting With Kids
By Jenny Doh
(20 Top Bloggers & Favorite Projects)

I just wanted to post about this great book that compiles 20 bloggers, with each talking a little bit about their creative life, and then sharing a favourite kid friendly project. I would love to get around to every project at some point but, so far, we have managed only one.

Levi printed gold trees with the potato stamp I made from a cookie cutter, and then he decorated the trees in red paint. I would have liked to add another colour of fabric paint for him to use, but running out to any shop right close to Christmas was not in my plans unless absolutely necessary (e.g. grocery store)!

I sewed them to a backing fabric with a ribbon for hanging attached, and he stuffed them.
A fun project, and one he is super proud of!


Looking back on the activity in the book that inspired our project, I see I should've taken the route of a raw edged ornament. Much simpler, quicker, and I even prefer the look of it.

I'd show you the finished product, but unfortunately Christmas came and went all too quickly in our house this year what with the listing of our home. All decorations were packed away quite swiftly after celebrating. Kind of sad, but also kind of exciting - time to get packing everything!!

Anyway, if you love crafting with your kiddies, this book is definitely worth having!
Oh, and yeah, HAPPY NEW YEAR! I hope everyone had a great start to 2013!
XO


Tuesday, December 18, 2012

Homemade Play Dough

This has been on my list of things to do for just about forever. Now that I finally made some homemade play dough, I see that I was silly to not do it before. It took less than 5 minutes to make 2 yummy smelling colours of dough.

Owen was eager to taste it, though I continuously told him that it would not taste good. He finally licked it, and then continued to do so several times, all the while thinking he was being hilarious, and I think deciding that it was, in fact, delicious. I'm sure he's already planned a full on taste test for his next go at the dough...


Levi was completely engrossed in his creating for a long time.
Being that it is totally edible, you can easily use all your cookie cutters, and cooking utensils as play tools for the dough. I put out all our Christmas cookie cutters for them to use.


I cannot find the site I used anywhere! It was a site showing recipes for all kinds of play dough. Well, there are hundreds of 'em online so I think it would be okay to share the one I used anyway...

1-2 cups of flour (1 cup was sufficient for me)
1/2 cup salt
3 Tbsp Vegetable oil
1 packet kool-aid (the packets that would otherwise make up a full pitcher - not the single serve's)
1 cup boiling water

Put flour, salt, and kool-aid in a bowl.
Add boiling water and mix thoroughly.
Once it has cooled slightly and is mostly mixed, it works well to blend it with your hands.
(The recipe said to start with 1 cup flour, and after the boiling water was added to add more if necessary.  Our dough was just peachy with 1 cup of flour.)
Store it in the fridge. I have our's in snap lock containers.
So simple!


 Just look at that concentration!


Thursday, November 1, 2012

Inspiration Board

I joined in on Sarah Ahearn Bellemare's online workshop Pages and Paint back in July. One component of her workshop found us creating, or, in my case, switching up and adding to, an inspiration board.

An inspiration board is, quite simply, a collection of things which inspire, and appeal to you.


Sarah's inspiration board was the wall directly beside her workspace. She used tape that wouldn't damage the paint and plastered stuff up that way. Other's had a small bulletin board, or even a shelf.
The "boards" of each person in the workshop were a wide array of sizes, shapes, and styles.

The beauty of this goodness, is that it doesn't require a huge amount of space. A small piece of wall, or shelf will suffice for your little collection of happiness!


My current one has space for all kinds of bits, but as we are planning a house move, my new home will call for a much smaller version. That may be tough, whittling down all my favourite paper ephemera... I suppose I'll just need to update it more often!


XO

Thursday, May 26, 2011

Sunshine from the Inside

A whole lot of straight pins, fabric scraps, buttons, ribbons and a styrofoam wreath make for a pretty fun and simple creative outlet, and maybe a bit of a mess. An easily tidied mess though. :)


Just trying to brighten things up inside, as the gray skies and rains continue outside.

Wednesday, May 4, 2011

Cloth Baskets


In the past week I stitched together these fabric "baskets" for the moms. SURPRISE!! (That was for the mamas). I love this project and have a list of people I want to make one for including myself.


It is quite a quick sewing project. A nice, open afternoon should about do it.
You can find it amidst January's projects in the 2011 sewing calendar.
The tutorial (by Joanna Armour) is also available online Here. The finished basket is 6 inches high and 11 inches across.

I'm just trying to decide what to put in them now. They'd make lovely gifts, holding a couple skeins of yarn and knitting needles or a set of crochet hooks.

I drew this bird template to create the applique for the grey basket.


*You are welcome to use this template for personal use

Here at Sew, Mama, Sew! is an excellent and very thorough tutorial on applique.

Monday, April 18, 2011

A Turtle For Sitting

I posted about this "to be completed" task a looooong time ago here and here. My grandpa made me this awesome little stool when I was a fair bit younger, and I have loved it. Unfortunately, as does happen, over time this poor old turtle lost his eyesight, acquired a couple holes in his shell, and just took a bit of a beating. He has finally been given a new lease on life. He can see again, he has a new shell, and a fresh coat of paint, er...um... skin??

BEFORE


AFTER


I found a bag of these fantastic eyes at the St.Jacobs Antique Market for 2 bucks. Anyone need eyes for anything??? I've still got several pairs left. Jim drilled holes in the turtle and glued the eyes in, and I painted him up and recovered his "shell". I am so excited that this little stool is now going to be a part of my little boy's lives as it was a part of mine!

Saturday, March 12, 2011

Sittin' Here In Limbo...

As it has been a week since my last post I should pop-in and mention that I am still awaiting our new little bundle whom, might I add, is seeming much less little with each passing day.
At this stage it is tough to feel anything but total limbo. A little bit glued to the house, and though a walk would probably help, I'm just too tired to get off my butt. Alas, having my mind totally reeling with "When?when?when?" makes it a wee bit tough to engage ideas for blogging, but I am still thoroughly enjoying keeping up with postings on all my favourite blogs.

Needless to say, It has been a week of couch-bound handwork.


It has been enjoyable, but I am SO ready for my time to be packed full of baby goodness & cuddles, and I am especially anxious to see my sweet little boy meet his new baby brother though, as I have been warned, he may shed a few tears. :(

Friday, February 11, 2011

Sock Knitting


I forgot to fill you in on my final 2 sock knitting classes.

Following the first class we were meant to work our way down the leg for a total of 6-7 inches, in time for the turning of the heel the next week. Needless to say I didn't quite get there. I arrived happily and quite proudly with my little ankle sock (it wasn't quite that short but I had only made it about halfway).
The other funny bit was that when I walked in thinking things were pretty great I glanced around at each person's sock and realized that mine looked nothing like theirs, and theirs all looked pretty much the same. They all must have messed up eh? ;)


Everyone was very lovely and told me how great it looked, but I just wasn't feeling it. I was coveting a nice tall ribbed sock like I was seeing around that room. I continued with the turning of the heel which went well, and was actually quite exciting to watch take shape.


Fingers crossed I can do it again because, needless to say, here is where I am with my socks now...


It's for the best because I have no idea where my mistake was, so to copy my error for the second sock would have been a little tough. My time with sock knitting is not yet over!

Wednesday, February 9, 2011

Thrifty Upcycle

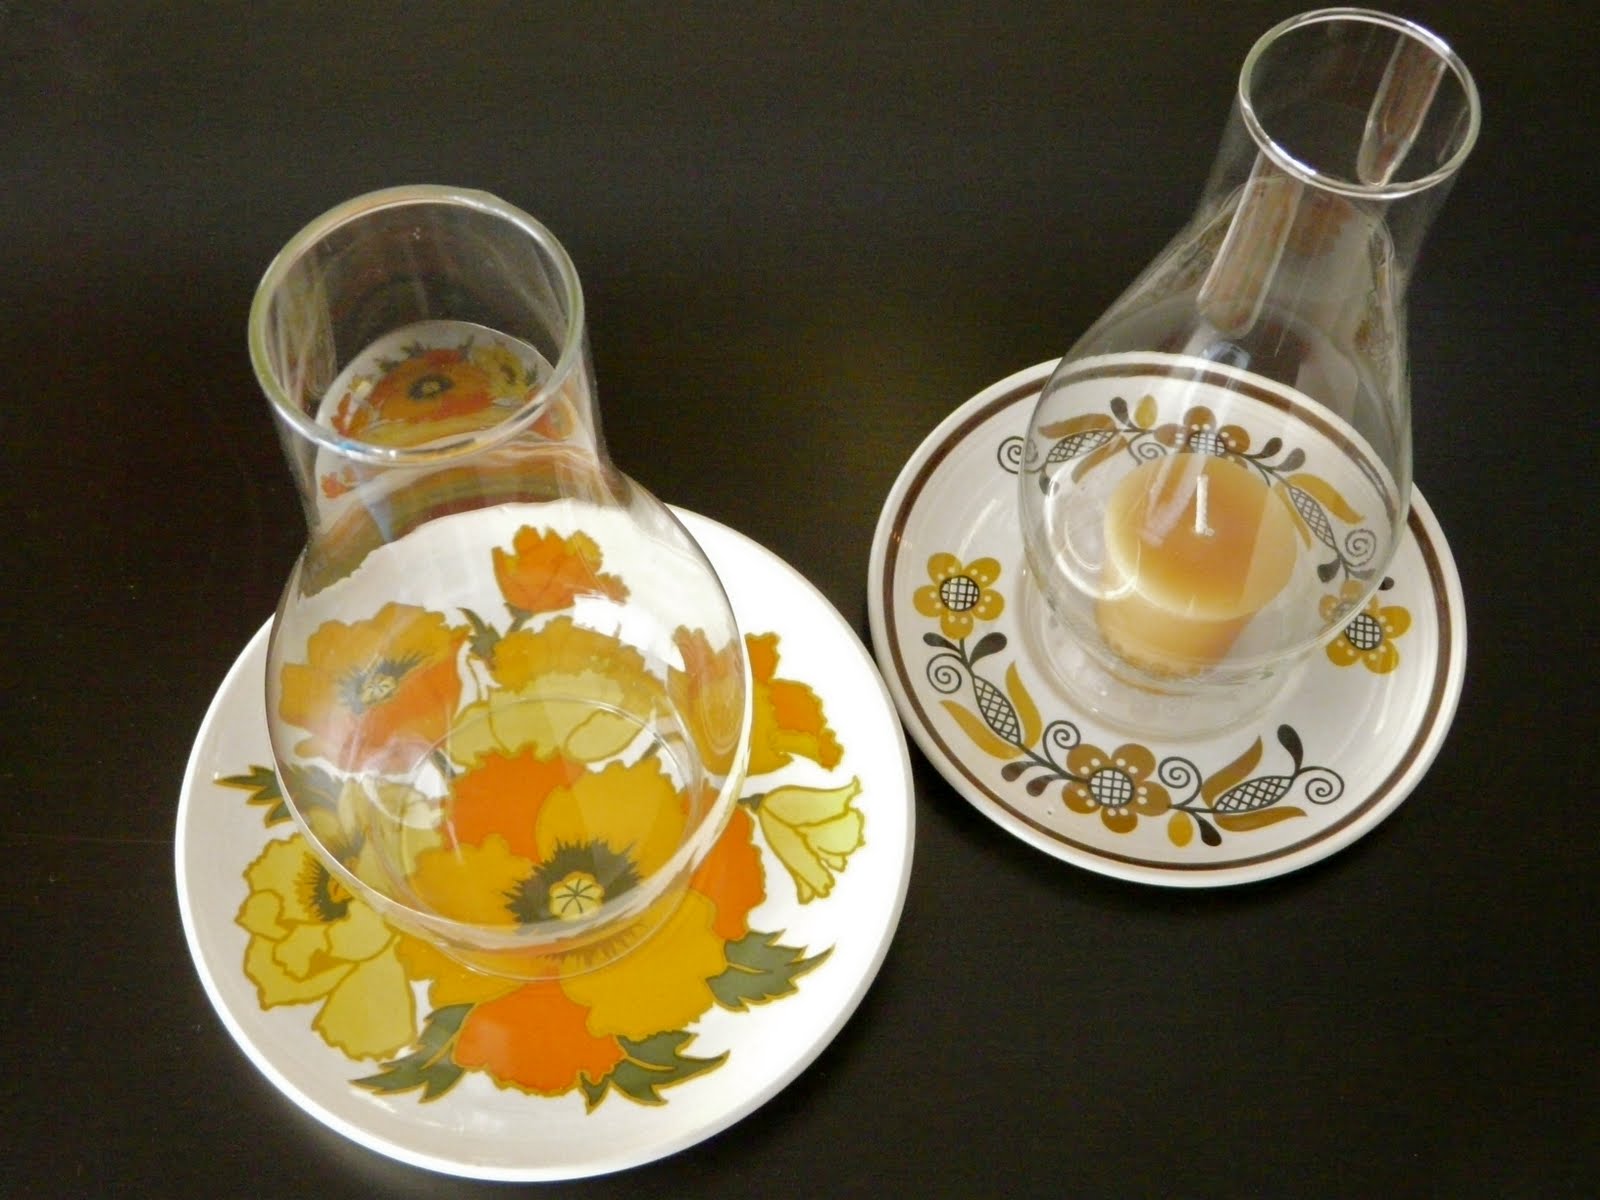
I just thought I'd share with you something very easy to find in your local thrift shop that makes for a really nice gift, or can add a unique little something to your own space.

I was always seeing piles of these glass hurricane shades at second hand shops for one or two dollars and knew there had to be something useful for them.


Funky lonely little porcelain plates are always readily available and while they can make a great soap/sponge dish for next to your kitchen sink, or a nice little spot on your vanity for loose change or lip balm, they also work great with a shade and votive.


*It helps to have one with you when selecting the other, to ensure that the inner cup rim of the saucer nests well with the shade.

Happy Thrifting!
xo

Thursday, January 13, 2011

In The Works

I'm working my way through THE list. I have no illusions of completing said list, but I sure do like having one to remind me of all the things I would love to do. Besides, it sure does feel good when something is checked off!

I've completed the book sling - #16 of my goals.

I have a nightly routine of weaving the ends in to my epic blanket (#15) note to self: (Everyone else is probably smart enough to know this already!) weave in ends AS YOU GO!! Man it sucks, but I will not be deterred. A couple finished ends each evening and then one night, suddenly, it will all be complete.

I have finished one of the two pairs of pants (#5) for my little boys - to be revealed when the pair can share the limelight.

AND...

I'm actually learning how to knit socks (#23). I have signed up for a three week course at my local yarn store which I started last night. All seemed to be going well, until I realized just moments ago that I have several more stitches kicking around on my needles than I started with - I really have no idea what to do with that, and I just can't see where it all went wrong. As it was fairly daunting to get into a rhythm I am very, very afraid to take it apart, but I suppose I may have to.


How are your New Year's Resolutions working out for ya?

Tuesday, January 11, 2011

Reading Corner

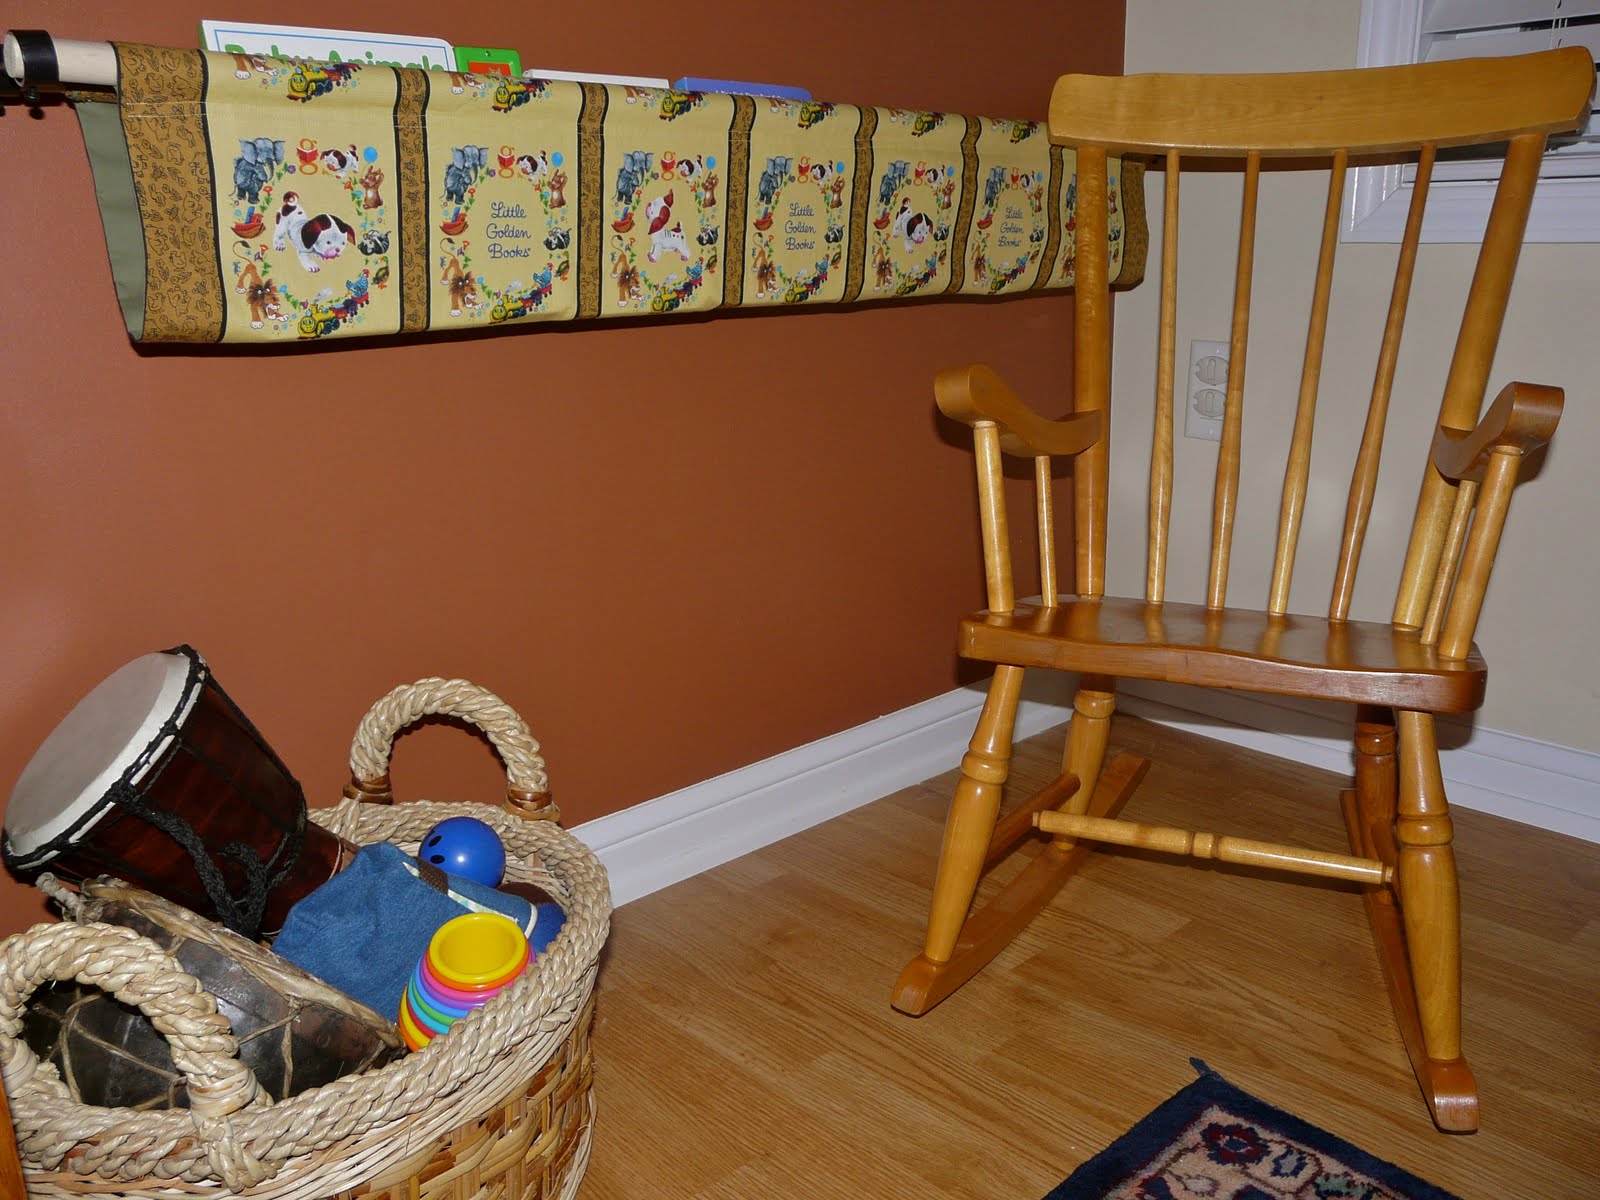
I have been wanting to create a reading corner for our little guy, and it all came together this past week. I picked up this sweet rocking chair from Kijiji (basically an online garage sale in Canada) for Thirty Dollars, sewed up the book sling, and my hubby sawed the dowels, hung the brackets and set it all up.


The book sling was super easy to put together. I had this great yard of Little Golden Books fabric I bought from The Tin Thimble on Etsy which worked perfectly for the project.


I didn't have quite enough to double it as per the instructions so I instead had 2 rectangles cut out at an inch more than she suggests to make up for the additional sewn edge, and then followed the instructions from there. The sling is lined with a thrifted sheet I had. It is a bit long for the book stage he is currently in (the smaller board books) but we just turned the back dowel to shorten it up before tightening the brackets.

You can find the tutorial for the book sling here. This clever holder of books is also in the 2011 Page-A-Day Sewing Calendar - which is totally worth buying. There are a ton of awesome projects in this calendar.

I am liking it very much and I think Mr.Levi does too.


I so hope he always loves books as much as he does now!
xo

Wednesday, December 29, 2010

My Crafty Goals

2010 was a good year for accomplishing my creative goals, and I think I have to thank blogging for that. I have been so inspired and encouraged by reading the blogs of others and by the great feedback and encouragement I have received through my own blog, so thank you SO, SO much to ANYONE who has read and responded to this little space of mine, and to all those people who take the time to share their own creative ventures and daily escapades. It is a pleasure to share and be shared with.

My goals have a tendency to be scattered on small scraps of paper throughout my life- my purse, my bedside table, my sewing table, the car, the kitchen, etc. It gets a little crazy, so thanks to the blog Make Something and "My Crafty List of Things To Do" I was inspired to compile a list of my own creative goals early this past year, which tend to be extensive.

I was encouraged and motivated by my list and kept it posted in my sewing room at all times. In 2010 I learned to knit, re-learned to crochet (after a brief, half-assed run at the age of 8), definitely improved in the sewing department (there's still a long way to go!), learned to use my serger, made lounge pants for my boy out of second-hand t-shirts using this tutorial, made this car cozy, created a toy strap, a birthday banner, and a rag bag, among a whole pile of other creative goals.
It was a pretty productive year I'd say, and I'm looking forward to an even more productive 2011.

I thought I would share my list for the coming year with you, maybe to inspire you to create your own, and definitely to keep my ideas in one place where I know it will always be when I want it.
And so, my personal list of crafty plans for 2011:

1. Sew a cover for my sewing machine
2. Crochet a rag rug
3. Make a twin bed quilt for a very special 2nd Birthday
4. Sew the "Four Corners Nursing Top" from Anna Maria Horner's Handmade Beginnings. Here is an interview with Anna Maria about the book on Purlbee.com. You can see a photo of the blouse about 4 pics down. DONE!
5. Sew a pair of "Quick Change Trousers" for both my baby boy, and my baby-boy-to-be. These are also found in Handmade Beginnings. I've shown a picture of the trousers in her book on one of my past posts. DONE!
6. Knit a blanket for our little one on the way (I was given some super soft, awesome cotton yarn for Christmas from my man that requires my attention VERY soon!). DONE? (Crochet instead)
7. Re-visit my childhood with a little corking project (also known as spool-knitting)
8. Sew an Ironing board cover. DONE!
9. Sew a picnic blanket similar to one of these.
10. Sew a men's Tie
11. Sew a Travel Laundry bag - A small goal, and yet one I have put off for ages! I meant to have one for our trip to Italy, so for sure this year we will travel with a hand sewn laundry bag (as opposed to stuffing dirty laundry in every small pocket of our backpacks).
12. Make pajama pants for myself. DONE!
13. Make the patchwork denim quilt that has been on my mind for years, and has had me moving 2 full totes of old jeans and denim material from place to place to place to place....
14. Compile and create the perfect travel sewing kit
15. Finish my crocheted blanket that is now on it's way to being in it's tenth month of production. DONE!
16. Create this hanging book display for a kids reading corner in the house - DONE!
17. Make a set of coasters for our family room (Be them knit, crocheted, or sewn, they gotta be soft!)
18. Design a cross-stitch pattern
19. Make Homemade lip balm - I've found some fabulous instruction on the process with this article.
20. Make a cork board out of the insane collection of wine corks I have saved. Here are a few images similar to what I'm thinking of.
21. Make a birthday crown for Levi. Here Soulemama talks about her family's love of the birthday crown and shows a few pics.
22. Create a pinch pouch
23. Knit a pair of socks

This list may be a little aggressive, but that's okay by me. If I accomplish even a few of these I will be as happy as a pig in... well, you get the idea. Accomplishment breeds accomplishment. Just start with one small project, actually finish it, and that toasty warm feeling that can only come from producing something with your own two hands will motivate you to start another, and then WHO KNOWS where your creativity may take you!! I'm hoping it takes me a pretty good distance through this list!
Happy Making :)

Sunday, December 26, 2010

Handmade for Hubby

I'm sorry I couldn't have shown these before and possibly helped somebody out with handmade gift ideas for the man of their house, but I just couldn't spill the surprises!

Matching jammy pants for daddy and baby boy. For Jim's pajama pants I used this super easy tutorial, and I plan to make myself a pair using the same.


A bi-fold wallet made from this tutorial.


And, two buttons thanks to a cheap badge maker I picked up at the craft shop. I sure would love a "real" badge maker but they seem to be at least a couple hundred dollars. :(
I cross-stitched the button on the left, and for the one on the right I found and printed a map I liked of my husband's birthplace.


So, this for real is my last handmade holiday post, even if it is belated. I'm looking forward to next year already!

Tuesday, December 7, 2010

Popcorn Anyone?


Of course my tree is not complete without some strands of popcorn draped along its branches, so that is just what I did this week. Popcorn garlands just add a certain warmth to the tree and the room they have decorated. They are super easy to make, and last several years before they get a little soft and need to finally be tossed - NOT eaten!

To make them you'll need:
Dental floss
A sewing needle
A big old bowl of popcorn
A few buttons

For the popcorn just pour a bit of oil in the base of a big pot - enough to just barely coat the bottom and set about 3 kernels in there. As soon as those 3 kernels pop your oil is hot and ready for you to pour in the rest of your kernels. For my 4 quart pot I put 1/2 cup of kernels. Keep giving the pot a good shake while holding the lid tight of course - just to ensure it won't burn. As soon as the popping noises slow down, remove it from the heat cause you're done!

You're ready to string 'em up. Don't try to make your garlands too long or you'll be dealing with mass entanglement and you may just want to give up on your stands and eat the whole bowl. Your tree won't get decorated that way!
I tie a small button to each end of the garland to keep those kernels on there. It does help.


For garlands it is much better to make your own popcorn. Microwave popcorn is too full of mysterious craziness, and bagged popcorn I think would go soggy faster. This is how we always make our popcorn and we think it tastes better this way too.
You'll want to make enough (of course) for snacking cause you know how it goes - one for the garland, three for me, and so on.
Enjoy!

Friday, November 19, 2010

Handmade Holiday: Ornaments

I love Christmas tree ornaments. I love taking them out of storage and examining each of them, placing them on the tree one by one, gifting them, making them, and collecting them.
They are such a huge part of the holidays - for me anyway.

Every year on Christmas Eve my brothers and I would open up a single gift which was always a pair of pajamas topped with a dated ornament. When each of us was married and moving into our own family home, we were given our ornaments collected through the years. It certainly was a nice little start for us, and decorating our tree is filled with precious memories from our childhood.
This tradition is definitely one to be carried on. I can't quite remember Levi's ornament last year, but this year I have sewn him a rocking horse from a 1983 Creative Circle pattern that was my mom's. My mom has made several from the patterns in this package.


Almost done! A few more stitches, attaching the reigns, and of course a ribbon for hanging.

Tree decorations are such a simple (usually), and fun project to add that little something something to the top of a present, or they make a great gift on their own. I generally love to top as many gifts as I can with one.

Sometimes I'll buy existing ceramic or wood cut-out decorations and paint them. It is one of the easiest things and you can often pick the ornaments up on a crazy post-holiday sale.


My next ornament I am planning on making is a holly hobby style one that has always hung on the Christmas tree at my mom's house. I took a photo of it which is floating around somewhere and I also drew a little picture of it so I have the general idea. It is a basic ornament so it shouldn't take too long, and yet it's these mini-projects we embark on -because we think they will be quick and easy- that tend to soak up a great deal of time.

One year I went mental on the origami paper for everything, and decoupaged these using existing papier mache type ornaments I grabbed on the extreme cheap.


Here are a couple I made just this past week. A quilt block which took surprisingly long, and a small felt one to be gifted.


A small accomplishment on my list of handmade items for this holiday.
xo

Thursday, October 21, 2010

A Very Simple Toy to Make

This is really the simplest "toy" to make. All I used was an empty formula container with the top, and a few tin frozen juice lids (they don't have any sharp edges). Really any container will do, and any lids will do.


Just cut a slit the size of the lids you are using in the top of the container, and you're done. I also covered the container in fabric to make it look a little nicer.

The little dude loves it! He just slides in the lids, runs to me with the container so I can open it and off he goes again. Guess I'll need to drink a lot of juice, cause there are only 4 lids right now - he's keeping me very busy!


It's amazing what will entertain your babes with you barely spending a cent. :)

Saturday, October 16, 2010

Creating space in my creative space

My little crafty corner was becoming a bit of a catch-all there for a while. Seeing as all I could think about was wanting to clean it up, there was no room in my mind for brainstorming and making :(.
Finally, I found a wee bit of time, and an extra dresser in the garage that needed a little fixing on a drawer but holds a whole lot more stuff which I desperately needed.

Here is a little peek at a few nooks and crannies in my creative space.


It may be a furnace room, but it's mine, and I love having any space at all!
xo

Friday, September 24, 2010

Making Room For Autumn

There are a great many things that have been keeping me from this space.


First and most importantly there is this little boy who is all out of sorts.
Ah, the mysteries of babyhood... Could it be teeth? A need for changes in naptime? Hunger? Overtired? Just plain tired? Sore tummy? AAAAAAHHHHH!!!!! These are the trials of his and our week. So far no solutions. Even a visit to the doctor proved futile. I just hate to see him upset. And I also struggle to carry him around as much as he currently desires it. Poor little fella. I think today, I will bust out one of my slings and just carry him as much as his little heart desires it :). Though I don't love him feeling down of course, for a little boy who seems to be growing out of his need for cuddles all too quickly I sure do love all the hugs lately! ;)

All the other little bits and bobs that are taking up my time all come down to this beautiful and busy time of year. Oh Autumn! I believe it's my favourite (though I feel like I may say that at the on-set of every season...).


Maybe because it was ingrained in me for so many years throughout school, but as soon as September hits so does the desire for routine and organisation. I have been doing a mass de-cluttering, and cleaning of all sorts. You know, the sort of cleaning that seems to get missed on an all too regular basis when you have a young one taking up most of your time.

My sewing space is piling up with projects, and the more projects, the less motivated I am to start on any one of them. Time to get the silliness out of the way so I can work on the good stuff. So I have been mending and creating the little bits that we "Need".

First on the list was yet another RagBag. Garage rags are a whole other kettle of fish, and therefore they need their own space. I suppose I could have saved myself the trouble and used an old plastic bag holder, but instead I made one out of the leg of an old pair of jeans. Denim is a good sturdy fabric that just seems to speak "work" - perfect for work rags right?


We don't use paper towels in our house, but found a need for something to soak up excess grease from frying bacon or other greasy kitchen jobs. Flour sack towels are a bit too big for this duty, so I cut one (the mankiest one I had) in half, ironed it, rolled and hemmed the cut edge and added a coloured tag so we could spot them easily. And there you have the "Grease rags".


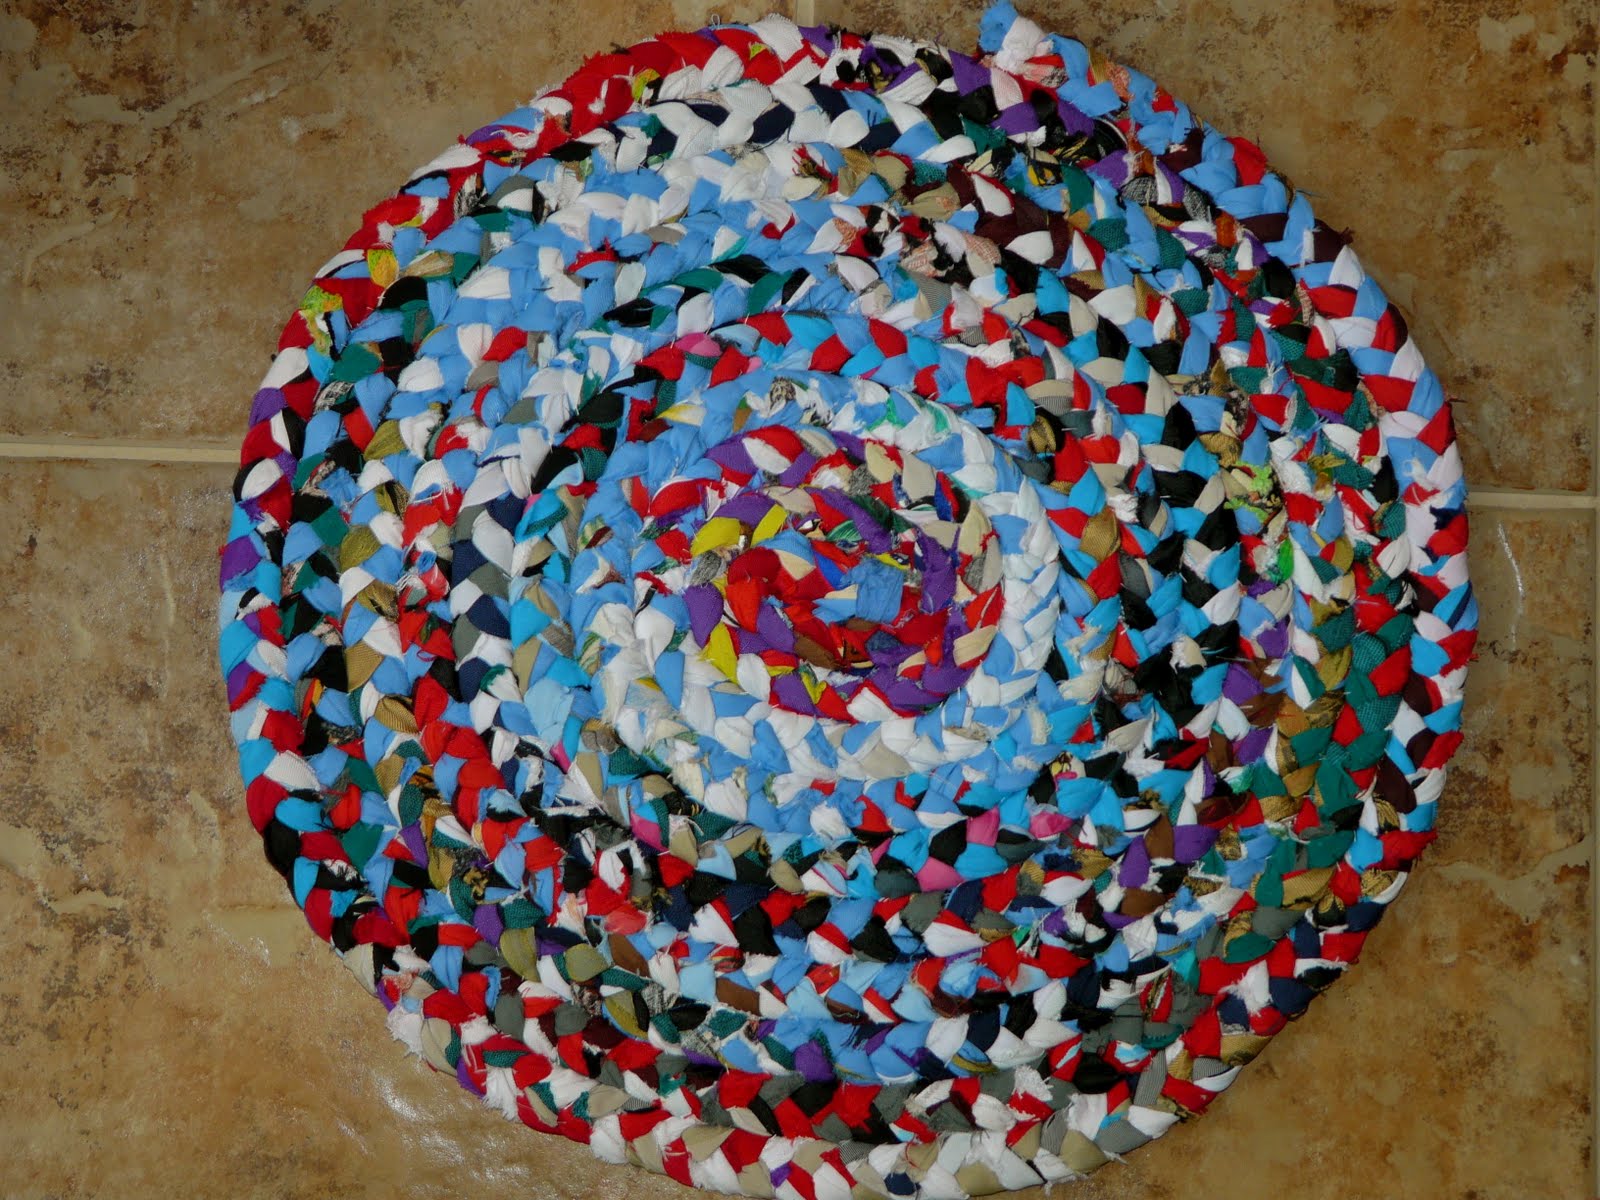
We bought a braided rag rug for the equivalent of a couple dollars at the market in Tongatapu, Tonga in 2008. It has been falling apart, not to mention taking up space in my craft room as a 'need to repair'. Instead of stitched together, it had been woven in a few spots and these pieces were coming out, and the gaps were becoming increasingly larger between each row. I had put it amidst some things to go to Goodwill, but just couldn't commit, and kept taking it back out to throw on my pile of things to do. A couple evenings on the couch (hand sewing is very relaxing), and I had it sewn up tight. Tonga holds a lot of memories for us, so I'm glad I decided to keep this little mat.
Stitching this baby together inspired me to make my own braided rag rug from beginning to end. I WILL find rubber thimbles for my thumb, pointer and second finger before venturing out on this though, because two days later and they are still crazy sore!

Before


After


I did a bit of baking the other night. Impulsive urge or need (it's a fine line) to bake chocolate chip cookies at 9:30pm?? It's hard to say, but it could be the pregnancy...
I don't know what I would have done had they not been insanely delicious. By the time they were out of the oven, I was near desperate!


This recipe? Yummy. While making them I came up about a 1/4 cup short on chips, and they were beyond chocolately so not to worry should you stumble upon the same problem. Also, I only had bittersweet chocolate as opposed to semi-sweet - still amazing!

Other than these things, and all the cleaning, we have been house shopping and car shopping. The house shopping may be the reason I am so intent on paring down - if only I could stay away from the thrift shops for a little while...
We would really love to find a little starter/training farm. I'm talking 1/2 to 1 acre. Just enough to explore our skills and learn a little.
Car-wise - don't judge me - but we are in the market for a van of the "mini" kind. We figure it's bound to eventually happen. Why fight it? All those that make fun the most and resist that same purchase themselves, will quite possibly be the ones calling us up to borrow. Anywho, in our defense we want a pop-up tent trailer and need something that tows and holds a good bit of gear. We are not SUV people at all, which leaves us with... A mini-van! WOW.

My little guy and I start a parent-child group at the Waldorf school next Monday. I am REALLY looking forward to this, and will let you know in detail how it goes. It is always so fun, and anxiety inducing watching your little one play with other little ones. You have to really be on your game to watch for those sudden movements - I'm talking about the ones that aren't looking to be hugs, love, and sharing. You know the kind that are more of the reaction exploring type?


So, now to get myself in top gear. I can feel the sniffles coming on, and I am not a fan. Must get healthy and find peace and order in this house. That's a fairly tall order, no?
I hope your Autumn is starting up just as busy or as chill as you want it to be!
xo